Tag

Photography

Browsing

In case you weren’t aware, deviled eggs are making a comeback. Just like egg mayo toast is practically breaking Tik Tok right now, the Greats of the cooking world are also looking back to the past and bringing forward deviled egg recipes in one mind-blowing incarnation after another. The inspiring thing is, that since the 70’s & 80’s when this gorgeous little googie was an every-gathering essential, we’ve now got access to an entire planet’s worth of ingredients… so deviled eggs be basic no more.

This particular recipe took its inspiration from a post that went viral with 12 different types of deviled eggs on it. It featured everything from original curry mayo to caviar and creme fresh and right in the middle of these mad creations was a gochujang and kimchi egg calling me into action… I love Korean flavours, and I already knew how well Rayu goes with eggs, so this recipe was pretty much inventing itself right in front of me. Plus it was an awesome excuse to throw a deviled egg party, because why not, 1773 again somewhere, surely!

If you’re like me, you’ve probably made lettuce cups a thousand times. They are so simple and quick to make, they pack a good punch of protein and are generally an absolute crowd-pleaser. Before finding this variation however, I’d yet to venture into the world of chicken in a lettuce cup let alone a marinade poached variety that brings an extra layer of flavour to the party in your mouth. Now that I’ve tried it, I’m a pretty big fan, and not only am I going to be making these on repeat, I’m also going to be experimenting with this technique all over the place, look out tacos, you’re in for a re-invention…

It just so happens that this recipe goes exceedingly well with a dose of our original homemade rayu, which, unlike most of the product-pitch focused recipes on this blog (and there’s plenty) is a genuine fluke and so of course, we hope you’ll also buy some and try adding this little something something extra. It is, however, a stand alone delicious dinner, and a pretty budget-friendly addition to your recipe repertoire as well.

Blackened salmon, burnt lemon, smoky cajun fries… I know what you’re thinking… is this just a recipe you made out of a dinner you accidentally left on the hotplate too long? Thankfully the answer is no! This was genuinely an intentional creation, and I’ve gotta tell you lads, this burnt lemon butter gig is an absolute revolution… it’s going on anything and everything that the cooking gods will let me bless with it. I’m not even joking, I’m a super fan, and it’s going straight to the pool room aka. this blog.

If you haven’t already tried it, then you might not have experienced it, “burnt” lemon is a thing ladies and gents, it’s like a strange form of caramelisation that I didn’t even know was possible until I saw one of the great’s blogging about it. (@carolinagelen just in case you’re not already following her) So naturally I had to try it, and I guess I also figured, what better to pair it with than an already outrageous concept such as blackened salmon, which incidentally I already knew was a taste sensation, but I’m happy to say that this little combo is next level enough you’ll be burning things left right and centre just to see whatever else you might come up with!

If you’re not a fan of the humble Brussels sprout, the first question I’d put to you is, have you had it any other way than boiled by your grandmother? Because I hadn’t, but once I discovered this humble vegetable in all its versatility, I’ve never been more of a convert in my life. Charred on the BBQ, coated with a glaze, baked with parmesan or added to a stir-fry; I’ve actually found myself quite impressed by all the ways in which this humble little cabbage impersonator can enhance your dinner table.

That said, I’d never thought of eating them raw before trying this recipe… I assumed they’d be too pungent and a little bit acrid… but if you’re going to get into the world of eating raw kale, you may as well throw caution to the wind and just get involved in the cruciferous-magniferous experience right? And, I’m here to tell you, expect to be impressed.

It’s a rare thing for me to make a recipe over and over again, but this salad is a very regular feature in my life. Not only because it’s downright delicious, but also because it’s just so blooming good for you AND because it literally keeps for days… it’s pretty much the only make-ahead salad that I know of that actually stays fresh at least till Wednesday!

kale and Brussels sprouts salad vegetable shot

For the love of kale, cabbage and all things cruciferous…

If kale and cabbage had a baby they’d have made Brussels sprouts… and actually, they did. Everything leafy green in this salad is a derivative of something extraordinary… hillside kale from long-forgotten Mediterranean times. I like to imagine some Shepard saw his goats eating its forefather (a leaf that looks like what you find on the outside of broccoli) and thought to himself “If it keeps the goats healthy, then maybe we should eat it too” and thus the whole evolution of the cabbage family and all of its derivatives was born. I have no idea if this is actually what happened, but I do like the idea of one random unassuming fellow accidentally making such a huge impact on the evolution of vegetables as we know them…

It is true, however, that all of the brassicas (cruciferous vegetables) we know today did come from these humble origins. We actually do have this one simple plant to thank for broccoli, cabbage, cauliflower, Brussels Sprouts, bok choy all the different types of kale and more. It’s extraordinary to think that all of these vegetables came from one little seemingly insignificant weed.

Kale me healthy…

The thing I love most about the vegetables of the cruciferous family, however, and one of the other reasons I love this salad so much, is that they are just so incredibly good for you. Instead of an Apple a day, the saying really should be “A brassica a day keeps the Doctor away”: They are packed with essential nutrients and bioactive compounds that provide numerous health benefits. From their capacity to contain obscene amounts of minerals and vitamins to their incredibly powerful phytochemicals, there’s an abundance of reasons why you’d want to make sure to incorporate them into your regular diet:

  1. Packed full of Nutrients: Cruciferous vegetables are generally an excellent source of vitamins, minerals, and dietary fiber. They contain vitamins C, K, and E, as well as folate and various B-vitamins. They also contain important minerals such as calcium, potassium, iron, selenium and more.
  2. Antioxidant Properties: Cruciferous vegetables contain powerful antioxidants like beta-carotene, vitamin C, and selenium. These antioxidants help protect the body’s cells from oxidative stress, which can reduce the risk of chronic diseases.
  3. Cancer Prevention: Studies suggest that the phytochemicals in cruciferous vegetables may help reduce the risk of certain cancers, including breast, prostate, lung, colorectal, and stomach cancers. The compounds sulforaphane, indole-3-carbinol, and isothiocyanates found in these vegetables are believed to have cancer-fighting properties – they are powerful anti-oxidants, detoxifiers, and may even help to reduce the amount of excess estrogen in a woman’s body.
  4. Anti-inflammatory Effects: Cruciferous vegetables contain anti-inflammatory compounds that can help reduce inflammation in the body.
  5. Heart Health: The high levels of fiber, potassium, and antioxidants in these vegetables contribute to heart health. These nutrients can help lower cholesterol levels, reduce blood pressure, and improve overall cardiovascular function.
  6. Digestive Health: Cruciferous vegetables are a good source of dietary fiber, which aids digestion and promotes a healthy gut. They can help prevent constipation and support a diverse gut microbiome.
  7. Detoxification Support: Cruciferous vegetables contain compounds that support the body’s natural detoxification processes. They can enhance the liver’s ability to detoxify harmful substances and promote overall detoxification.
  8. Bone Health: Rich in vitamin K and calcium, cruciferous vegetables can help to build and maintain strong and healthy bones. Adequate vitamin K intake is essential for bone health as it helps regulate calcium absorption.
  9. Improved Immune Function: The high levels of vitamin C and other antioxidants in cruciferous vegetables help the immune system function at its best.

So whether you’re about to roast a cauliflower, or contemplating adding some broccoli to your next stir fry… I’d highly recommend getting more of these veggies onto your plate. And certainly, at the very least incorporate this salad into your life: it’s a health bomb in every nutritious and delicious serving.

It is with great sadness and a heavy heart that have to announce that I ate kale and liked it.

Greg Behrendt

close-up-kale-and-brussels-sprout-salad.

Preparing a kale salad you actually want to eat…

The secret to a great kale salad is two-fold

  1. Chop it so fine you can’t tell which vegetable it originally was
  2. Salt it and massage it so the moisture starts to release and soften the leaf material – leave it for a good 10 min or more.

Then add everything else…

A note on ingredients:

Whilst this is a relatively simple salad to make, there are some things worth noting about how to get the best and tastiest results, and some ways you may wish to change or enhance things to make it suit your own personal tastes.

brussel sprouts and kale

Kale: You can use either Tuscan or curly kale for this recipe, I’ve used both and I actually use a combination of the two because I like the diversity in textures – but any kale will do. Just leave out the stalks, they are definitely too chewy.

Brussels sprouts: I chose to use purple sprouts for this recipe – but mainly because I just thought they were so pretty and wanted to photograph them. I usually use regular sprouts for this recipe, but if you can find the purple ones, they are really very good for you, so it’s no harm going purple if you can!

Pecorino: You could probably use another hard cheese if you can’t find pecorino, but you would need to add extra salt to the recipe if you do – it’s definitely the extra saltiness in this cheese that contributes to the overall deliciousness of this dish.

Almonds: I always use roasted, but sometimes (which let’s you know what a foodie I am) I’ve only had smoked almonds on hand… and let me tell you, the flavour is fabulous, so if you can find smoked almonds I highly recommend you use them instead – but they at least need to be roasted – raw almonds just don’t cut the mustard so to speak.

Salt: I use Himalayan pink salt probably because I’m am ex-hippy but you can use any good quality sea salt.

Mustard: Being a family with a resident French person, we always have Dijon mustard on hand – and I think it works brilliantly in this recipe, that said, I can imagine that wholegrain mustard would work too.

Lemon: I don’t think you could substitute in lime or vinegar and have the same full-powered flavour experience. There’s something about the combination of pecorino, almond, and lemon that really works – but if you were mid-creation and realised you’d no lemons on hand, possibly apple cider vinegar may also work.


The World’s Best Kale and Brussels Sprout Salad

Prep Time 30 minutes
Total Time 30 minutes
Servings 4
Cheesy, salty, crunchy and fresh this vibrant and oh-so-nourishing salad is certain to become a new favorite in your weekly meal prep and a summertime dinner favourite.

Equipment

  • 1 food processor with slicing attachment

Ingredients

  • 1 head curly kale (stems removed)
  • 1 bunch tuscan kale (stems removed)
  • 1 whole red onion (chopped fine)
  • 500 grams brussels sprouts (outer leaves and stems removed)
  • 1 cup pecorino (grated fine)
  • 1/2 cup roasted almonds ((smoked also go really well))
  • 1/2 cup lemon juice
  • 1/2 cup olive oil
  • 2 tbsp dijon mustard (more to taste if you like)
  • 2 cloves garlic
  • 1 tsp salt

Instructions 

Prepping the greens

  • Chop the Brussels sprouts and kale extremely fine using a food processor or with a sharp knife and a lot of patience/skill
  • Add about 1 tsp of salt to the greens and massage it through, set aside for at least 10 minutes before adding the other ingredients.

Assembling the salad

  • Mix olive oil, mustard and lemon juice with a pinch of salt and pepper for the dressing.
  • Combine all ingredients and mix through the dressing.
  • Serve topped with a sprinkle of chopped almonds and shavings of pecorino.

Notes

  1. This dish is probably the most filling salad you’ll ever eat so it works very well as a main event, but it also equally pairs with chicken and fish as a side. 
  2. This recipe makes 4 servings so if there are leftovers, you can store them in an air-tight container for up to 5 days!
Course: dinner, lunch, Main Course, Side Dish
Keyword: kale and brussels sprout salad

Did you make this recipe?

Lovely. Now let me know how you liked it. Tag me @thetastyspoonful on Instagram or send us a message on Facebook @ The Tasty Spoonful

While I have you here, may I suggest few you try next:

Until next time. Keep following and commenting and may your every spoonful be tastier than the last!

These Thai chicken meatballs are so unbelievably flavorful and make a wonderfully healthy and nutritious mid-week meal, especially paired with an Asian-style salad. Made with ground chicken, Thai spices, and breadcrumbs, they can be baked or fried to perfection, and they are 100% customisable to your own taste preferences.

I tend to serve them with a sweet chili dipping sauce as an appetizer or pair them with rice or noodles and something fresh on the side as a main course, but however you serve them, I can guarantee that you’ll be making these again and the kids are going to love them!

There’s nothing more nourishing than a warm bowlful of noodles, packed full of spicy ginger and bursting with Asian flavours. But what’s the difference between a good ramen and an exceptional one? It’s the broth of course, and this recipe does not disappoint. This tofu ginger, miso ramen is totally customisable to your personal taste, but one thing you won’t want to skimp on is the miso… the deep rich umami flavour is what truly carries the dish, go hard or go home!

These nasturtium pesto zoodles are made with a unique twist on traditional pesto. Made with peppery nasturtium leaves, garlic, olive oil, and Parmesan cheese, it has a bright and slightly spicy taste. It’s also incredibly versatile and can be used in a variety of dishes, from pasta to sandwiches to roasted vegetables.

Given my foraging past, I’ve made nasturtium pesto every which way that you can imagine; but for this recipe, I took inspiration from some incredibly lovely Irish food bloggers Ireland “The Gastro Gays” and decided to use raw pistachio nuts – which are, in my opinion, a very under-utilized nut in the non-middle eastern culinary world.

A pesto experience to remember

Combined with the umami flavours in white miso, I consider this pesto to be one of the most elevated I’ve been able to create from the humble nasturtium leaves I love so much. And you can better believe it’s a plant I love for all of its versatile uses, including being super easy to grow, abundant in it’s produce and a peppery flavour that you just can’t reproduce.

A dinner fit for an evening full of sunshine… Nasturtium pistachio pesto courgette noodles. As pretty as a picture, deliciously different and tasty to boot!

Me when I first discovered this recipe!

Take a walk amongst the nasturtiums

There are many reasons to fall in love with this incredible plant, if you are a gardener then you’ll probably already know it well. Not only does it grow uniquely flavoured edible leaves extremely prolifically, it also produces beautiful edible flowers in a variety of colours. Whether you grow it as a ground cover, a source of leafy greens or as a farm to table source of beautiful garnishes… it’s certainly a plant i’d recommend adding to any home veggie patch.

When to Harvest: As soon as it makes leaves you can basically start harvesting, and unlike other leafy greens, the taste doesn’t intensify or turn more bitter as it ages and gets bigger – it does get slightly tougher however. The flowers of course should be harvested when they appear and at your fancy.

Cooking with it: I use pretty much all of the nasturtium plant, the young tender leaves in salads & sandwiches for a peppery bite, and the larger older leaves for pickling and pestos. I use the flowers in salads and even dehydrate them to soak in oil for salad dressings. The firey seeds can be enjoyed raw or cooked and pickled to form a caper-like substitute. Nasturtiums pair well with ricotta and cottage cheese.

Alternative uses for nasturtium pesto

I made this recipe to be specifically fit for a Summer’s evening, having stumbled upon a patch of nastirtiums and felt inspired for the first time in a long time to harvest from my surrounds. It was hot (by Irish standards) and I wanted to eat something that didn’t make me feel over-full or weighed down. So I went the zucchini noodle route; but let’s be honest, I also had an abandoned spiraliser that had been sitting in the cupboard for years that my partner was adamant I’ll never use… so I also felt it important and appropriate to make sure to prove him wrong. *laughing face emoji*

But this pesto is nothing more than a beautifully tasty spoonful… and because of that it actually has a mirad of applications if you feel like experimenting.

nasturtium pesto zucchini pasta

Bog standard pasta: Pesto and pasta, it’s a no brainer, but interesting twist here, firey nastirutium actually pairs extremely well with seafood, so consider adding it to a peppery butter and grilled prawn pasta or think anchovies and gnocchetti… still interesting, certainly different but definitely a more filling affair than a bunch of airy spiralised courgettes.

Roasted vegetables: Simply roast your faves, especially potatoes or anything from the realm of the Mediterranean and toss with a good coating of fresh pesto whilst still warm. Top with some feta and toasted nuts and Bellissima will be the word!

From the ocean: As I mentioned before, nastirtium are renowned for their perfect paring with all things sea-derived, you may even choose to add a small touch of powdered kelp or fish flakes to your pesto to prepare and even more pescalicious creation. I’d happily dollop a teaspoon of this pesto on a pan grilled fillet of cod or baramundi and similarly I’d expect to see this on a plate of garlic prawns or charred octopus as well.

Do’s and don’ts of zoodle making

There really isn’t a lot to it, but there are some things that I’ve picked up in the few times that I’ve made them. I know I said I’d abandoned my spiraliser, but, I actually felt a bit more inspired after making this dish to see what else I could create with them. I also went Keto for 6 months too just after this, so these noodle substitutes because invaluable to me then too!

  1. Fresh is best. Make your zoodles at the time you’d like to serve them. You really can’t make zoodles ahead of time, the water content of the zucchini means that within around 30 minutes you’re going to find that you get a soggy bowlful of what used to be a crunchy and refreshing noodle substitute… and nobody likes a floppy noodle!
  2. Don’t be salty! For the same reasons as above, don’t salt your zoodles directly, try to add the seasoning to the sauce so it’s not in direct contact with the zucchini.
  3. My partner won’t let me buy another kitchen gadget. Not allowed to purchase a spiraliser? Or just got too much kitchen tech taking up space? Never fear, with a small amount of patience you can scrape your way into a very similar experience – enter zettuchini – life fettuccini but made with zucchini – simply use a vegetable peeler and peel yourself a bowlful.

A note on ingredients

There’s not a lot to this recipe in terms of preparation but there are a few tips and tricks that will make sure you have a fresh, crunchy and vibrant experience in every mouthful.

Pistachios: These days it’s easier to find raw shelled pistachios but just in case you’re wondering, don’t use the roasted salted ones, and definitely don’t attempt this recipe with the shelled version, otherwise it will take you two days to make a dish that is designed to be super quick and simple to prepare.

Parmesan: I have a feeling that there might be even better suited strong flavoured hard cheeses that would elevate this dish even further – perhaps a manchego or a really aged comte – but I’ve not had enough experience with the dish to experiment that far. I would love to hear from you guys if you do though!


Nutty Pistachio and Nasturtium Pesto Noodles

A dinner fit for an evening full of sunshine… Nasturtium pistachio pesto courgette noodles. As pretty as a picture, deliciously different and tasty to boot!

Ingredients

For the pesto

  • 1/2 cup pistachios (raw)
  • 2 cups nasturtium leaves (packed cups)
  • 1 tsp white miso
  • 1 clove garlic (peeled)
  • 3 tbsp olive oil (extra virgin)
  • 2 tbsp parmesan cheese (grated)

For the zoodles

  • 2 large zucchinis (spiralized)

Instructions 

  • For the pesto: Add to food processor and blend to your liking.
  • For the assembly: Simply stir the pesto through the zucchini noodles and serve with a shaving of parmesan and extra pistachios on top.

Did you make this recipe?

Lovely. Now let me know how you liked it. Tag me @thetastyspoonful on Instagram or send us a message on Facebook @ The Tasty Spoonful

While I have you here, may I suggest few you try next:

Until next time. Keep following and commenting and may your every spoonful be tastier than the last!

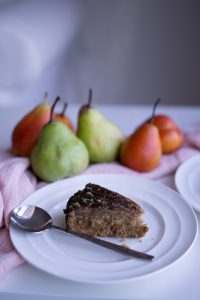
This Incredible Hazelnut and Caramelised Pear Cake is a stunning baked treat that combines the nutty flavor of hazelnuts with the sweet and warming taste of sugary spiced fruit. Perfect for any occasion, be it a family gathering, a dinner party or a cheeky afternoon tea. With its rich, moist texture, and topping of perfectly caramelised pears, when served warm with a dollop of ice cream or whipped cream, it’s basically the ultimate comfort food… and it even gives the traditional old sticky date pudding a run for its money. There, I said it, #noremorse… but I promise you I can actually back it up!

This recipe is super easy to follow and requires simple ingredients that are sure to be already available in your pantry. You can also customize the cake according to your taste preferences by adjusting the sweetness level or with the addition of syrup or caramel sauce at serving time. *Insert chai-spiced syrup recipe here* (I will absolutely get around to this one day… sure I will…)

Little actions make the bake..

Every time I bake, I think of my grandmother Joyce, the wife of a WWII soldier, a mother of 3 children and the primary cook in their household for almost 75 years. I remember her second cupboard full of canned goods and sundries designed to ensure the family would never go hungry and that they were always prepared for a rainy day. I remember her always making time to bake with me and the first time we made a chocolate cake together. I remember being in her kitchen and her insisting on using the electric beater to cream the butter and sugar until it was pale before adding the other ingredients. And I remember her talking about how fast a wooden spoon falls in the cake mixture as a measure of whether the cake will be moist enough or not.

These little tips and tricks were so seemingly innocuous at the time, but years later, they are still the most valuable pieces of advice she ever gave me – and in the making of this cake mixture, they were absolutely invaluable.

Bake it your way…

Whether you make it gluten-free, dairy-free or neither, in order to create its incredible fluffiness and moistness, one important step is absolutely essential: You gotta beat, beat, beat that butter and sugar baby, and continue beating with your eggs. I’ve failed this cake by skimping on this critical step and I can guarantee that whilst the stodgy version was still in its own way delicious, it just isn’t as satisfying as melt in the mouth experience that’s created with the pillowy consistency you can get just by making sure of this one simple step.

Cake nummy.

Darcy – 2 years old

The best part about this recipe is that it truly tastes just as good without the allergens… I’ve made this both gluten- and dairy-free and no one was the wiser, and honestly, I actually preferred it! But, most home cooks won’t have all the GF & DF ingredients to hand so I made this version with regular flour so nobody would miss out on the deliciousness. But, feel free to substitute away. I also think this cake lends itself well to wholemeal, spelt or buckwheat flour.

Also check out: Healthy date bars

How to pick the right pear for the cake

Incredible Hazelnut and Caramelised Pear Cake slice

When it comes to picking pears, most regular Australian varieties will do for this recipe, but notably, not all pears are equal when it comes to baking. The most important consideration for this bake is getting the right level of caramelization, and contrary to what you’d think, it does help to use a harder-eating pear like the beautiful Red Corella – it holds its shape and seems to crisp up better.

That said you will also get the same type of results from a bog standard Packenham or Williams as long as they are properly ripe or overripe – you’ll just have a less firm result in your pear topping. But still equally as delicious when caramelized.

If you’re looking for the best pears for baking in Australia, here are five varieties to consider:

  1. Packham: This is the most commonly used pear for baking due to its firm texture and sweet taste. 
  2. Beurre Bosc: This pear has a slightly spicier flavor than the Packham and is also firm enough for baking. 
  3. Corella: This pear has a softer texture when ripe, making it ideal for use in cakes and muffins. 
  4. Josephine: This pear has a sweet and juicy flavor and holds its shape well when baked. 
  5. Williams: This pear has a soft texture and is best used in recipes that call for cooked or poached pears.

Baking the perfect fruit cake

Something I really love about this recipe is that it goes with the flow, meaning that it’s an acknowledgment that no matter whether you coat your fruit in flour or try one of the many other suggested tricks out there, it’s likely that some of your fruit will sink to the bottom of your cake mixture… *insert eyebrow lift here* So why not put it on the bottom in the first place and use the fruits natural tendency to caramelise to your advantage? Personally, I think it’s a little stroke of genius!

When you are baking with fruits there are always a few things to be mindful of, however:

  1. Make sure to choose fruit that is ripe but still firm, as overly ripe fruit can become too mushy during baking.
  2. Consider using a variety of fruits for added complexity of flavor, some varieties of pears are more spicey or floral than others.
  3. This recipe doesn’t call for it, but in some cases, you will need to balance the sugar in your recipe based on the sweetness of the fruit you are using.
  4. If you do decide to get creative and add some pear pieces to your bake, be mindful of the water content of the fruit and adjust accordingly, as too much liquid can affect the texture of your baked goods and your cooking time.

Ingredients: A run through

Since this is one of those fairly basic cake bases, most household ingredients will do but some tricks I’ve learned include

Flour: I’ve used a potato starch and rice combination for the gluten-free flour when baking sans gluten… I find this preferable to using a completely rice-based flour and it also is less gritty. I’ve also used just plain old regular flour for this recipe and had great results too. I do think you can get away with a denser spelt or wholemeal flour for this recipe too due to the consistency of the final bake.

Sugar: I’ve actually used both rapedura and coconut sugar for my brown sugars and they both give great results. It is essential to use the caster sugar however for the cake mix itself otherwise your batter won’t whip properly (as I found out!)

Butter: It’s perfectly fine to use unsalted butter in this batter, I just always use what I have on hand which is always salted because I’m a flavour fiend (in case you hadn’t noticed). That said I’ve also used Nuttlex and had amazing results, so you can happily make this cake dairy-free without any worries about the effect on its consistency.

Eggs: As always I prefer eggs from pasture-fed chickens, there is an actual method to the madness here. Chickens should normally have a diet of up to 80% insects and when they are fed on grains alone they just don’t get the same nutrients that wild-farmed chooks get, which affects the flavour of the egg-yolk – no I’m not yolking around!

Spices; I used my pantry staples on this one, but I do remember being in a cooking course in Morocco and being told that store-bought spices were culinary blasphemy because they essentially “taste like sawdust” so if you are a purist like this lady, feel free to blend your own. That said, you may want to cut down on the quantity because it’s likely that fresh is going to be far more full power than my pantry staples…

This recipe is most definitely a sensation. I really hope that you try it, and please do not do yourself a disservice and go without the finishing touches. Sit down, put your feet up and serve it warm with ice cream and my chai spiced syrup.(I promise I’ll get onto this soon…)

Incredible Hazelnut and Caramelised Pear Cake

Prep Time 1 hour
Cook Time 1 hour 30 minutes
Total Time 2 hours 30 minutes
Servings 8
The Incredible Hazelnut and Caramelised Pear Cake is a delicious dessert that combines the nutty flavor of hazelnuts with the sweet and juicy taste of caramelized pears. This cake is perfect for any occasion, whether it's a family gathering or a dinner party

Equipment

  • 1 20cm cake tin

Ingredients

For the caramel pears

  • 4 whole pears (sliced evenly around 5mm)
  • 75 grams unsalted butter
  • 1/2 cup brown sugar
  • 1 tsp ginger powder
  • 1 tsp cardamom powder

For the cake

  • 180 grams butter
  • 200 grams caster sugar
  • 100 grams brown sugar
  • 3 regular eggs
  • 250 grams flour ((gluten-free works fine))
  • 100 gram hazelnut meal
  • 1 1/2 tsp baking powder
  • 1 tbsp cardamom powder
  • 2 tbsp cinnamon powder
  • 1 tbsp ginger powder
  • 1 tsp all spice
  • 1/8 tsp clove powder

Instructions 

  • Preheat an oven to 180°C (350°F).
  • Grease and line the base of a 26cm (10.2 in) cake pan with baking paper.
  • Increase and line the base of a 26cm (10.2 in) cake pan with baking paper.
  • Layer the sliced pear in the cake tin in a spiral pattern. Pour the sugar mixture over the top of the sliced pears
  • In a mixer, add the butter and caster sugar. Beat until light and fluffy.
  • Beat in the eggs one by one.
  • Sift together the flour, baking powder, spices, and hazelnut meal. Gently mix into the wet ingredients while also slowly pouring in the milk.
  • Pour cake batter into the prepared cake tin.
  • Bake in the oven for 1 ½ hours or until you can get a knife to come out clean from the centre of the cake – I check it from 1 hour onwards.
  • Allow to cool for 5 minutes in the cake tin.
  • Remove from tin and allow to cool.
  • Serve & Enjoy.

Did you make this recipe?

Lovely. Now let me know how you liked it. Tag me @thetastyspoonful on Instagram or send us a message on Facebook @ The Tasty Spoonful

While I have you here, may I suggest you try these next:

Until next time. Keep following, liking, sharing, commenting and cooking, and may your every spoonful be tastier than the last!

This caramelised orange cake is a moist and flavorful bake that’s always a guaranteed crowd-pleaser. Serve with orange-infused whipped cream or ice cream for a decadent dessert or eat as is for an easy and always satisfying afternoon tea treat. I really think this is one of the easiest cakes you could ever make, and I’ve never met a person who didn’t like it.


I first discovered this cake when I was looking for easy gluten-free bakes to bring to a friend’s dinner party, I was aware that we were going to endure quite the flavorsome feast hence I was looking for something light, bright and melt-in-your-mouth delicious. This cake came to my attention because it was blood orange season and beautiful pictures of red-veined oranges started to float around the internet – I was transfixed. This recipe, however, works just as well without them. It is, of course, enhanced by the beautiful extra layer of complexity that the blood orange fruit brings to the bake.

Oranges that work well for this recipe:

  1. Navel Oranges: Navel oranges are one of the most common and widely available types of oranges. They are easy to recognize due to the small, “navel” or second fruit at the blossom end. They have a sweet and slightly tart flavor and are great for eating fresh.
  2. Valencia Oranges: Valencia oranges are often referred to as “juicing oranges” because they are exceptionally juicy and have a well-balanced sweet-tart flavor. They are commonly used for making orange juice.
  3. Blood Oranges: Blood oranges have a unique dark red to maroon-colored flesh due to the presence of anthocyanins. They have a distinct sweet flavor with raspberry-like undertones. Blood oranges are often used in salads, desserts, and cocktails.
  4. Clementines: Clementines are small, seedless oranges with a glossy, easy-to-peel skin. They are sweet and slightly tangy, making them a favorite snack for both adults and children.


A note on ingredients:

As always with such a simple bake, quality ingredients make the end results.

Eggs: I always look for eggs from pasture-raised hens when I can find them, whether it’s psycho-sematic or not, I just find they have the most delicious yolks but any eggs will do really.

Oranges: As above

Sugar: This recipe really needs caster sugar, it’s a light bake so a denser sugar will take away from some of the fluffy joy of the end bake.

Almond meal: Due to the lack of other fat in this recipe it’s important to use almond meal and not almond flour because some of the flours have had the fat removed and you’ll get a denser and not as flavourful a cake.


Irresistible Caramelised Orange Cake

Prep Time 1 day 1 hour 40 minutes
Cook Time 45 minutes
Total Time 1 day 2 hours 25 minutes
Servings 8
Always a crowd favourite, this cake gives you serious flavour for very little effort. Serve slightly warm with orange-infused whipped cream or simply eat as is for a satisfying afternoon or morning tea treat.

Ingredients

For the cake

  • 1 whole orange
  • 3 medium eggs
  • 225 grams caster sugar
  • 250 grams almond meal
  • 1 tsp baking powder

caramelised orange layer

  • 1/2 cup caster sugar
  • 1 whole orange (blood oranges preferably )
  • 3 tbsp orange juice

Instructions 

For the caramelised top

  • Grease an 8-inch springform cake tin.
  • Cut the orange into thin slices and layer on the cake tin.
  • Meanwhile add the orange juice and sugar to a pan and dissolve the sugar. About 5 min on a low-med heat.
  • Pour the liquid over the orange pieces and set aside ready for the cake batter.

For the cake

  • Put the whole oranges in a small pot and cover with water. Bring to the boil. Cover and simmer for at least 1 hour until orange is tender. Drain and cool.
  • Cut the orange in half and remove the pups. Whiz it up in a food processor to make a smooth puree.
  • Put the eggs and sugar into a stand or hand mixer and whisk together until thick and pale. Make sure that you really whip them as you won't get the right consistency in the final bake if not.
  • Fold in the ground almonds, baking powder and orange puree.
  • Pour into your prepared tin over the orange slices.
  • Bake at 180 for 40-50 minutes or until a skewer comes out clean.
Course: afternoon tea, Dessert, morning tea
Cuisine: Mediterranean
Keyword: cake, easy desserts, orange cake

Did you make this recipe?

Lovely. Now let me know how you liked it. Tag me @thetastyspoonful on Instagram or send us a message on Facebook @ The Tasty Spoonful

While I have you here, may I suggest few you try next:

Until next time. Keep following and commenting and may your every spoonful be tastier than the last!

I’ve been wanting to make date bars for a while now, but couldn’t bring myself to take something that sounds so healthy and make it well… so completely not! So I decided to have a crack at making a healthier version. The difference is not only the ingredients, it’s in the way the bars are cooked and constructed. I chose to individually bake the oat layers, and process the dates raw, so that I didn’t have to turn dates into an even higher GI treat than they already are, and I have to say I’m pretty happy with the results! It’s kinda like two Anzac cookies with a date filling! What’s not to love?!